(originally published for Fabule Fabrications, but as they closed down their Clyde website, I’m safekeeping it here. Unfortunately, it is not the final version.)
So Halloween came and went! Clyde went trick or treating this year! But what can Clyde do with all the treats he? Here’s one project that Clyde can get in. We will use gummy bears [ Wikipedia | http://en.wikipedia.org/wiki/Gummy_bear] to control the ambient light. So get into your candy stash, and find three gummy bears: red, green and blue. We’ll wait here patiently while you get the candy.
What? There are no blue gummy bears? You looked carefully everywhere and you couldn’t find a blue gummy bear? You’re right. Standard gummy bears don’t come in blue, and that’s a shame, isn’t it? Although there are some jellied candy out there that are blue, we’ll have to make do with the colourless Gummy Bear for this project. Or you can go and get blue squishable candy, that’s fine too. As for us, we chose a huge edible spider.
So we now have our three gummy bears: red, green and colourless. The goal of this tutorial is to be able to control the ambient light by squishing each bear. The red one will give us a red light, the green one a green light, and the colourless standing in for blue will give us blue. Should we squeeze two at a time, we’ll get the combination of the corresponding colours. The ambient light is activated as long as at least one gummy bear is squeezed. The basic behaviour is *not* that of a light switch, our gummy bears will not act as on/off switches. At least not yet.
I see you’re puzzled, and rightly so. How can we control some electronics with candy??? We’ll have to put some wires inside to make the bears “electron-able”, and the bears will act as pushbuttons. When squeezed, they will connect the wires inside them. When not squeezed, the wires will not connect. This is the basic behaviour of a pushbutton. In fact, this whole tutorial is based on the pushbutton found on the Arduino website: http://arduino.cc/en/Tutorial/Button If you’re unfamiliar with Arduino programming and/or basic electric circuits, may we suggest going through this Button tutorial first, as we will not be duplicating the information that’s already nicely explained over there. This tutorial is basically the same done three times.
Needed material
Here’s a list of what you will need:
- three gummy bears of adequate colours.
- three metal paper clips that you are willing to sacrifice, or six dressmaker pins.
- three resistors (I used 330 ohms, because that’s what I had nearby)
- 11 male to male jumper wires. Hopefully, three red, three green and three blue. The other two can be any colour. We used black for 5V and white for ground.
- a little breadboard, as small as possible, so it can fit inside of Clyde
Diagrams:
We have included a diagram we created with Fritzing, a free simple electronics documentation software, to help demonstrate the connections. Clyde is not a Fritzing part, so we use a Leonardo in its place.
A black wire goes from the 5V pin to the breadboard, a white wire goes is for ground. As we want to use coloured wires for our gummy bears, we won’t use standard colours in this project. For each gummy bear, you need a wire that goes from 5V to inside the gummy bear, and another that goes from inside the gummy bear to its respective pin (10 for red, 12 for green and 13 for blue). You then need a wire from each pin to a small resistor; the other end of that resistor is linked to GND (ground). The schematic found at http://arduino.cc/en/Tutorial/Button can be very helpful in understanding the one gummy bear / pushbutton circuit. The explanations are also quite clear as to why a resistor is needed.
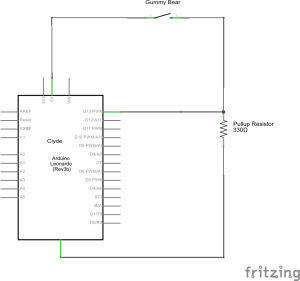

Schematic for one gummy bear and Clyde
As gummy bears are absolutely not good conductors when it comes to electricity (nor cars, I assume), may I suggest you leave them out of the circuit till the very end. Just use the end of the wires that should be in the gummy bears as loose wires. We’re using low voltage, there’s no danger. Or you can use pushbuttons for now, if you have them. The gummy bears will only be inserted into the circuit once everything else is working to our satisfaction.

The Clyde code
The code is pretty straightforward.
1. We first include the necessary headers to access Clyde’s libraries
#include <Wire.h>

#include <EEPROM.h>

#include <Clyde.h>

#include <SerialCommand.h>

#include <SoftwareSerial.h>

#include <MPR121.h>
2. We declare three constants for our pins that will read the gummy bears status:
const int rBUTTON = 10;

// this is where we will read the red Gummy Bear
const int gBUTTON = 12;
// this is the pin where we will read the green Gummy Bear
const int bBUTTON = 13;
// this is the pin where we will read the blue Gummy Bear
3. Then we run the setup() function once, which initializes everything for us:
the first two lines are needed to initialize Clyde
the last three lines initializes our gummy bear input devices
void setup() {

Wire.begin();

Clyde.begin();

// set the three Gummy Bears as input devices

pinMode(rBUTTON, INPUT);

pinMode(gBUTTON, INPUT);

pinMode(bBUTTON, INPUT);

}
4. The loop function is where we read our gummy bears. As the pins can only give us 0 (for ‘not squished’, and 1 (for ‘squished’), we need to multiply that by 255 in order to get a decent value for our colours. We then pass those three RGB values to the RGB function, and use that to call setAmbient().
void loop() {
/*
Read status of all three gummy bears.
If they’re squished, they will register as HIGH.
Otherwise they will be low.
Each gummy bear is independent of each other
*/
rval = digitalRead(rBUTTON)*255;
gval = digitalRead(gBUTTON)*255;
bval = digitalRead(bBUTTON)*255;
Clyde.setAmbient(RGB(rval,gval,bval));
}
Idea for more fun:
Instead of just multiplying by 255, you can do it incrementally, or even randomly, for a variety of effects.
Final code all in one place:
| /* | |
| 3 Gummy Bears - Halloween Hack 2014 | |
| written by Nicole Parrot | |
| Heavily based on code by DojoDave and Tom Igoe, as found on the Arduino website. | |
| http://arduino.cc/en/Tutorial/Button | |
| The circuit: | |
| * uses Clyde's Ambient light, RGB connected to pins 5, 6 and 9 | |
| * 3 x gummy bears respectively attached to pin 10, 12 and 13 from +5V | |
| * 3 x 330 ohms resistors respectively attached to pin 10, 12 and 13 from ground | |
| This code uses the Clyde library | |
| This code is in the public domain. | |
| */ | |
| #include <Wire.h> | |
| #include <EEPROM.h> | |
| #include <Clyde.h> | |
| #include <SerialCommand.h> | |
| #include <SoftwareSerial.h> | |
| #include <MPR121.h> | |
| const int rBUTTON = 10; // this is where we will read the red Gummy Bear | |
| const int gBUTTON = 12; // this is the pin where we will read the green Gummy Bear | |
| const int bBUTTON = 13; // this is the pin where we will read the blue Gummy Bear | |
| // the ambient light will be off by default | |
| int rval = 0; | |
| int gval = 0; | |
| int bval = 0; | |
| void setup() { | |
| Wire.begin(); | |
| Clyde.begin(); | |
| // set the three Gummy Bears as input devices | |
| pinMode(rBUTTON, INPUT); | |
| pinMode(gBUTTON, INPUT); | |
| pinMode(bBUTTON, INPUT); | |
| } | |
| void loop() { | |
| /* | |
| Read status of all three gummy bears. | |
| If they're squished, they will register as HIGH. Otherwise they will be low. | |
| each gummy bear is independent of each other | |
| */ | |
| rval = digitalRead(rBUTTON)*255; | |
| gval = digitalRead(gBUTTON)*255; | |
| bval = digitalRead(bBUTTON)*255; | |
| Clyde.setAmbient(RGB(rval,gval,bval)); | |
| } |
| /* | |
| 3 Gummy Bears - Halloween Hack 2014 | |
| written by Nicole Parrot | |
| Heavily based on code by DojoDave and Tom Igoe, as found on the Arduino website. | |
| http://arduino.cc/en/Tutorial/Button | |
| The circuit: | |
| * uses Clyde's Ambient light, RGB connected to pins 5, 6 and 9 | |
| * 3 x gummy bears respectively attached to pin 10, 12 and 13 from +5V | |
| * 3 x 330 ohms resistors respectively attached to pin 10, 12 and 13 from ground | |
| This code uses the Clyde library | |
| This code is in the public domain. | |
| */ | |
| #include <Wire.h> | |
| #include <EEPROM.h> | |
| #include <Clyde.h> | |
| #include <SerialCommand.h> | |
| #include <SoftwareSerial.h> | |
| #include <MPR121.h> | |
| const int rBUTTON = 10; // this is where we will read the red Gummy Bear | |
| const int gBUTTON = 12; // this is the pin where we will read the green Gummy Bear | |
| const int bBUTTON = 13; // this is the pin where we will read the blue Gummy Bear | |
| // the ambient light will be off by default | |
| int rval = 0; | |
| int gval = 0; | |
| int bval = 0; | |
| void setup() { | |
| Wire.begin(); | |
| Clyde.begin(); | |
| // set the three Gummy Bears as input devices | |
| pinMode(rBUTTON, INPUT); | |
| pinMode(gBUTTON, INPUT); | |
| pinMode(bBUTTON, INPUT); | |
| } | |
| void loop() { | |
| /* | |
| Read status of all three gummy bears. | |
| If they're squished, they will register as HIGH. Otherwise they will be low. | |
| each gummy bear is independent of each other | |
| */ | |
| rval = digitalRead(rBUTTON)*255; | |
| gval = digitalRead(gBUTTON)*255; | |
| bval = digitalRead(bBUTTON)*255; | |
| Clyde.setAmbient(RGB(rval,gval,bval)); | |
| } |
The raw Arduino code
This code does not use Clyde’s firmware and libraries, but only uses the Arduino functionalities. We will be talking to pins directly, and reading them directly. The ambient light is controlled by pins #5, #6 and #9, for the RGB components (R:5, G:6, B: 9)
CODE:
| /* | |
| 3 Gummy Bears - Halloween Hack 2014 | |
| written by Nicole Parrot | |
| Heavily based on code by DojoDave and Tom Igoe, as found on the Arduino website. | |
| http://arduino.cc/en/Tutorial/Button | |
| The circuit: | |
| * uses Clyde's Ambient light, RGB connected to pins 5, 6 and 9 | |
| * 3 x gummy bears respectively attached to pin 10, 12 and 13 from +5V | |
| * 3 x 330 ohms resistors respectively attached to pin 10, 12 and 13 from ground | |
| This code uses the Clyde library | |
| This code is in the public domain. | |
| */ | |
| #include <Wire.h> | |
| #include <EEPROM.h> | |
| #include <Clyde.h> | |
| #include <SerialCommand.h> | |
| #include <SoftwareSerial.h> | |
| #include <MPR121.h> | |
| const int rBUTTON = 10; // this is where we will read the red Gummy Bear | |
| const int gBUTTON = 12; // this is the pin where we will read the green Gummy Bear | |
| const int bBUTTON = 13; // this is the pin where we will read the blue Gummy Bear | |
| // the ambient light will be off by default | |
| int rval = 0; | |
| int gval = 0; | |
| int bval = 0; | |
| void setup() { | |
| Wire.begin(); | |
| Clyde.begin(); | |
| // set the three Gummy Bears as input devices | |
| pinMode(rBUTTON, INPUT); | |
| pinMode(gBUTTON, INPUT); | |
| pinMode(bBUTTON, INPUT); | |
| } | |
| void loop() { | |
| /* | |
| Read status of all three gummy bears. | |
| If they're squished, they will register as HIGH. Otherwise they will be low. | |
| each gummy bear is independent of each other | |
| */ | |
| rval = digitalRead(rBUTTON)*255; | |
| gval = digitalRead(gBUTTON)*255; | |
| bval = digitalRead(bBUTTON)*255; | |
| Clyde.setAmbient(RGB(rval,gval,bval)); | |
| } |
| /* | |
| 3 Gummy Bears - Halloween Hack 2014 | |
| written by Nicole Parrot | |
| Heavily based on code by DojoDave and Tom Igoe, as found on the Arduino website. | |
| http://arduino.cc/en/Tutorial/Button | |
| The circuit: | |
| * uses Clyde's Ambient light, RGB connected to pins 5, 6 and 9 | |
| * 3 x gummy bears respectively attached to pin 10, 12 and 13 from +5V | |
| * 3 x 330 ohms resistors respectively attached to pin 10, 12 and 13 from ground | |
| This code uses the Clyde library | |
| This code is in the public domain. | |
| */ | |
| #include <Wire.h> | |
| #include <EEPROM.h> | |
| #include <Clyde.h> | |
| #include <SerialCommand.h> | |
| #include <SoftwareSerial.h> | |
| #include <MPR121.h> | |
| const int rBUTTON = 10; // this is where we will read the red Gummy Bear | |
| const int gBUTTON = 12; // this is the pin where we will read the green Gummy Bear | |
| const int bBUTTON = 13; // this is the pin where we will read the blue Gummy Bear | |
| // the ambient light will be off by default | |
| int rval = 0; | |
| int gval = 0; | |
| int bval = 0; | |
| void setup() { | |
| Wire.begin(); | |
| Clyde.begin(); | |
| // set the three Gummy Bears as input devices | |
| pinMode(rBUTTON, INPUT); | |
| pinMode(gBUTTON, INPUT); | |
| pinMode(bBUTTON, INPUT); | |
| } | |
| void loop() { | |
| /* | |
| Read status of all three gummy bears. | |
| If they're squished, they will register as HIGH. Otherwise they will be low. | |
| each gummy bear is independent of each other | |
| */ | |
| rval = digitalRead(rBUTTON)*255; | |
| gval = digitalRead(gBUTTON)*255; | |
| bval = digitalRead(bBUTTON)*255; | |
| Clyde.setAmbient(RGB(rval,gval,bval)); | |
| } |

